|
|
|
Solar Thermal Photovoltaics
|
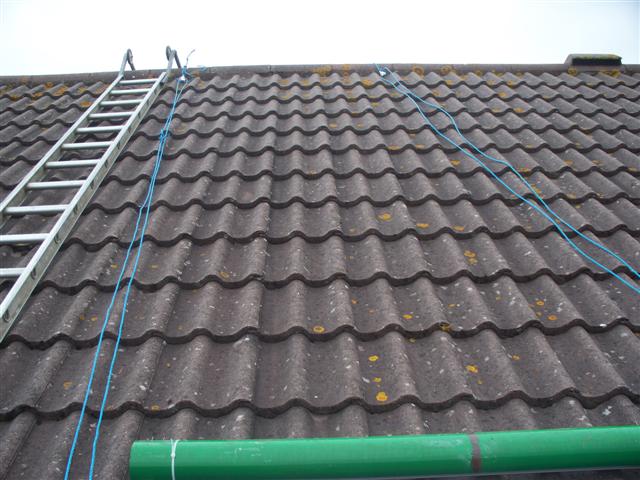
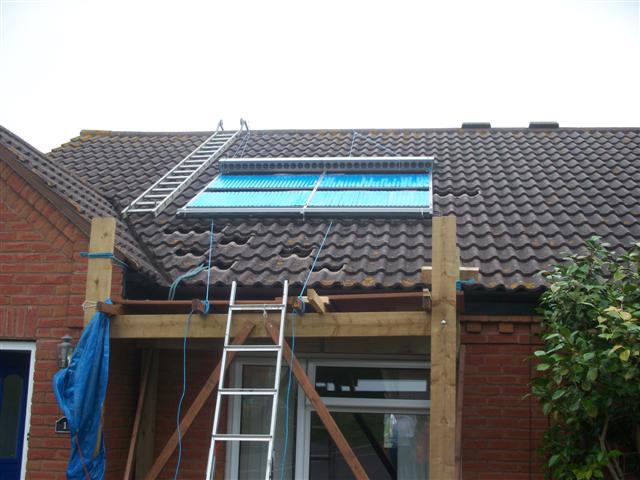
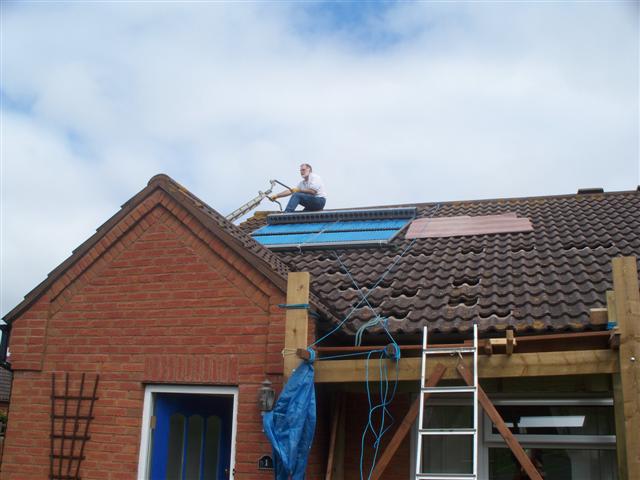
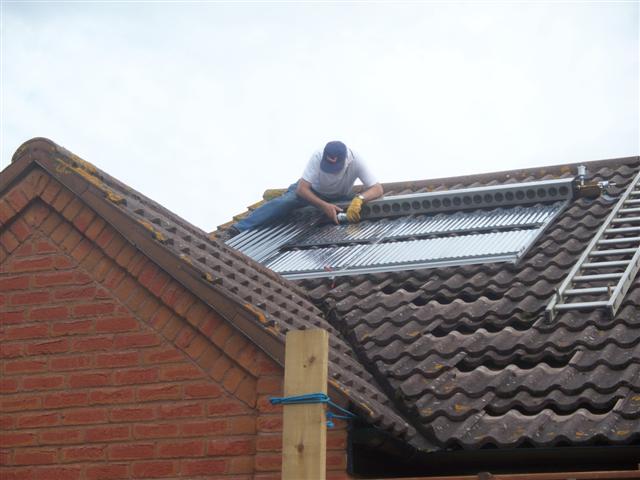
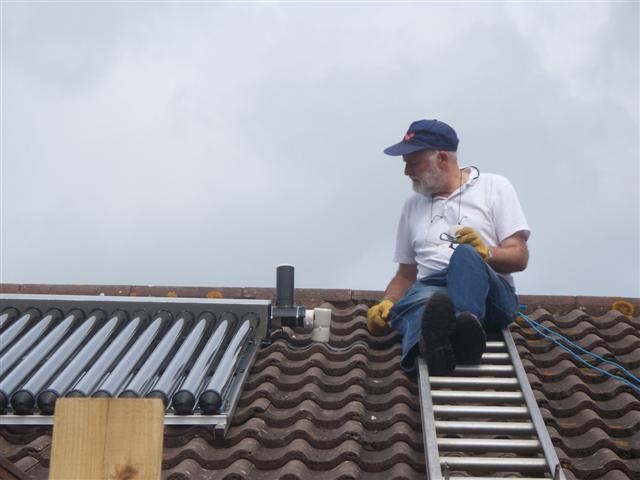
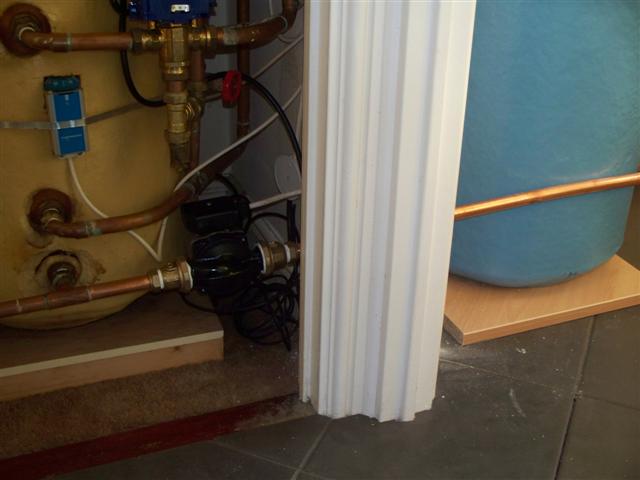
Mike Edwards purchased components for a solar hot water system including an Eco-58-1800-30 collector and Flowcon A pump station. Mike writes: "On the first of August 2008 we decided “now” was the right time to visit Eco-nomical at Upton on Severn. I had been quizzing Simon several days before regarding a heat exchanger coil to replace the immersion heater in my existing tank,.. something he wisely advised against. However, we rolled up completely unannounced, and were greeted by a very friendly (and knowledgeable) young man called Viv. He was able to answer all my questions, and I was soon convinced that we had come to the right place at just the right time. (The very next day Gas & Electricity prices went up by MASSIVE amounts!!) We settled on an 1800-30 panel, with a PumpStation and BS3 controller, plus all the bits & pieces to make a working system. I decided to go for the “belt & braces” approach regarding air elimination, and ordered an Air Vent (for the roof), plus Air Scoop (for bottom of the loop). All parts were in stock, so no problems there! Viv helped us carefully load all of the items into our motorhome, despite being constantly interrupted by eager customers on the phone! The journey home to Minehead was fortunately uneventful, and all tubes arrived unscathed. Late Summer in the U.K. in 2008 was typically “British”…. Wet & windy…, so picking the right time to install the system single-handedly was the first challenge! Fortunately it’s only a bungalow, so, being a bit of a maverick, a quick trip to Minehead Sawmills for some stout timber saved me the considerable cost of hiring scaffolding. I was determined not to require any help at altitude, so didn’t need to involve the health & safety “nannys”. One has to be responsible for one’s own safety in all aspects of life… It’s called “being CAREFULL”!.... A substantial working platform was soon constructed at the front of the property; properly cross braced, and tied into the roof in three separate places. The basic panel frame was assembled and, being very light, was easily lifted onto the working platform on a windless day. The manifold, being somewhat heavier, took a bit more effort, but was by no means a struggle, as the platform was only about 2.3 metres high.(some extra thought may have been necessary if we lived in a house!) Manifold & frame were joined in matrimony on the lower part of the roof, in an inverted position in order to tighten the fixing nuts easily. Lengths of guttering were fixed to the manifold, and to the bottom bar of the frame, using cable ties. These would help the whole assembly to slide upwards over the tiles more easily. Ropes were deployed right over the roof, and tied down to substantial anchors at the rear. Pulleys were fitted just this side of the ridge, with two long lengths threaded through and attached to both ends of the manifold. With a helper on the ground holding the two ropes, and myself only on the platform, the whole assembly was flipped over (right side up), and was ready to start its’ upward journey. Some old carpet was inserted under the leading edge of the manifold (now at the top of the assembly) to help it slide over the tiles. With some upward assistance from me on the roof, plus some even and steady pulling on the ropes from the ground, the whole thing made smooth progress up the roof. (this could have been achieved single-handed, at somewhat greater risk) When I was satisfied that the bottom rail had cleared the gable ridge on the left, both ropes were tied off, and the ladder was moved to enable a lateral shifting to the final position, over the front apex. This would enable the shortest pipe runs to the tanks below.. With both ropes still attached, it was now a relatively easy task to feed stainless steel fixing straps under appropriate tiles to substantial noggins fixed across the rafters inside. Compression fittings, and Air Vent were introduced to the ends of the manifold, and tiles were carefully marked for drilling. It is wise to try to end up with your holes through a ridge on each tile rather than in a valley, in order to minimise rainwater ingress. Fortunately I had some lead left over from a previous job, so I was able to make two “lead tiles” to fit around the pipes. Sealant was also employed, just to make sure! (just as well… as the next three days were particularly wet & windy!! … good test though!) The next challenge was flushing and filling the solar loop…. again… and again…. and again. I was plagued with pressure loss, due to small leaks. The most troublesome joints were those on the Air Scoop. It seems that the threads on this device are rougher than those on the brass fittings, and even the application of multiple layers of PTFE tape, plus all my (remaining) strength in tightening, would not achieve a perfect seal. An extra roll of PTFE tape plus a different brass fitting, having a longer thread, finally achieved a seal. Beware… try to get fittings with long threads for both the Air Scoop and the Air Vent. Given that the weather was now becoming quite unreliable, it became necessary to temporarily overlook the pressure loss problem, and to “crack on” with installing the tubes at every opportunity. In order to “not require any help at altitude” I decided to glue the bottom caps to each tube with a small ring of silicone sealant. This enabled me, working totally on my own, to insert each tube into the manifold, then leaving it in total confidence, with the bottom clip resting on the lower bar, whilst transferring my position to beneath the panel, to clip it into its final position. By the time I had completed this operation thirty times, I was becoming quite agile! The application of a little Silicone Oil to each of the rubber seals greatly aided the insertion of each tube. Populating the entire panel with tubes took several days…. Not least due to weather constraints, but also available space for the “gluing” process; plus an innate feeling that “nothing should be rushed”. Accidents are far more likely to happen if you are in too great a hurry! Each day as work progressed we noticed a steady increase in the rate at which the temperature in the loop was rising; even when overcast. So, the gas HW was promptly turned off, and hasn’t needed to be used for backup so far (late Sept). All thirty were eventually completed without mishap (just in time, before another torrential downpour!), and all exposed pipework was duly insulated. A piece of old gutter downpipe was used to protect the Air Valve from the elements. When previously discussing systems with Simon, he had suggested that I might like to take a look at what Larry has achieved. (http://www.eco-nomical.co.uk/larryellender.htm). Larry’s system effectively doubles the amount of heat one is able to store. I got to thinking about the way that hot water flows in a tank, and decided to try a similar technique. Rather than installing my solar heat-store above my existing tank, I decided to fit one of similar capacity alongside; at exactly the same level. (fortunately I had the space) I figured that, if I connected the two tanks in parallel, then the water that was in the hottest tank would be the first to move upward and to the taps. Additionally, by fitting a pump to the cold water feed to the solar store, and a non-return valve in the hot water out of the solar store (before it Ts with the existing HW out), I could achieve a one-way energy dump of solar hot water into the existing tank at a predetermined temperature. Sure it will upset the stratification in the existing tank, but the solar store will eventually need that cool water in order to continue the harvesting process. And, when the existing tank gets the shot of hot solar water its own thermostats will turn off both immersion heater and gas boiler. It’s early days for results as yet, but I have performed some tests using the immersion heater to heat the existing tank, and the tubes to heat the solar store, the results of which strongly indicate that the theory of “hottest water moving first” is basically sound. Must get another temp sensor so that my BS3 can monitor the temp of the existing tank as well as that of the solar store……… With this installation I have proved that, given the right circumstances, it is possible to do the job entirely single-handedly. However, I do not advocate the use of any of the climbing methods shown by anyone lacking previous roofing experience. If you employ someone, or even ask someone to help out on the roof, you MUST comply with ALL of the Health & Safety legislation. The methods I used were based solely on years of experience of working at height, and my own safety was entirely my own responsibility. The job was completed with absolutely NO MISHAPS!... The only “luck” involved was the timing of the weather…One simply HAS to be VERY CAREFULL!.... Take the time to think EVERYTHING through properly…. DO NOT RUSH ANYTHING!" Mike added: "Just a note to thank you very much for your excellent products and service, and to say that my installation is now up and running..... with TWO tanks of hot water at between 50 & 60degC over recent days."
Thanks for the thorough write up, Mike.
|
Send mail to
SW@eco-nomical.co.uk with questions or
comments about this web site.
|